

- Happy Activism: A Sustainable Way to Create Change Without Burnout - February 9, 2026
- The Meaning of Critical Thinking: A Key Skill for Navigating Today’s Information Landscape - November 3, 2025
- Grandparents Can Develop Activist Grandchildren - September 29, 2025
Last Updated on September 10, 2025

My son gave me the best gift – a homemade harvest bag.
Environmental activism is a passion of mine. One way I support the environment is by growing heirloom varieties in an organic garden. I avoid pesticides and artificial fertilizers. Instead, I use a variety of composting techniques to support my plants. I also save seeds.
Of course, now is the time of year when you can’t rely on making a bowl out of your T-shirt bottom to hold everything you want to pick. He’s seen me trying to haul my produce into the house.

Hence, his idea for the harvest bag.
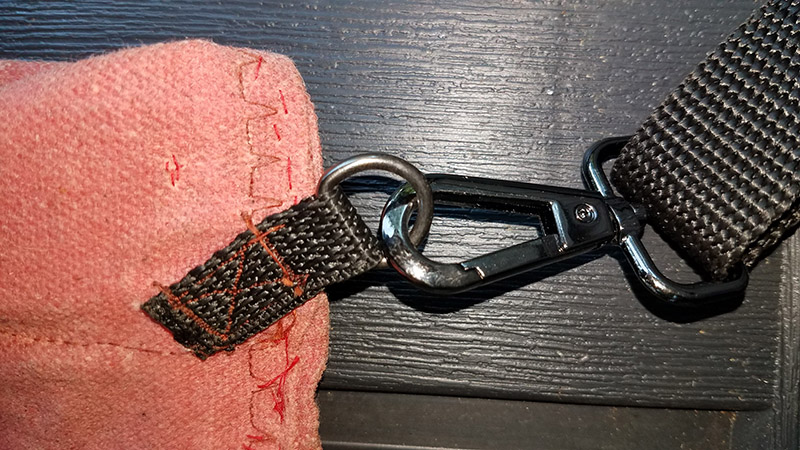
I use my harvest bag every day. It is easy to use and durable.
The bottom of the canvas bag rectangle is open and clips up while I am harvesting. Then, when I go in the house, I unclip the bottom and slide the produce gently onto the counter or into the sink.
The top contains a stiffener to hold the bag open, letting me drop veggies and fruits easily into the bag.
The waxed canvas bag is water-resistant and washable.
The straps wrap over my shoulders and around my back, and when I bend over, the bag gently falls forward so I don’t spill anything or crush my produce.
How To Make Your Harvest Bag
Caveat: My son wants me to say that he saw a few harvest bag pictures and used them as a template for the bag. He is not a designer or sewer. He also wrestled with our sewing machine on the thick canvas, breaking some needles.
So, if you sew, you can probably design and sew an even better harvest bag. One that suits your skills and tools.
Materials List
- Waxed canvas, enough for 2 sheets 27″ tall and 16 inches wide
- 4 1/2″ D-rings
- 2 1″ D-ring lobster clasps
- 2 1/2″ D-ring lobster clasps
- 1″ poly webbing, approximately 10 feet
- 1/2 ” poly webbing, approximately 1 foot
- 2 1″ sliders
- Plastic canvas sheet
- Thread
Harvest Bag Assembly
Step 1
Prepare 6 D-ring loops. For each, cut two inches of 1/2″ webbing, pull the webbing through the D-ring, and sew it in place.
Step 2
Prepare 2 straps. For each, cut 5 feet of the 1-inch webbing. Use a heat source to slightly melt the edges, so they don’t fray. Add the slider and 1″ lobster clasp.
Step 3
Cut 2 16″ long and 1 1/2″ wide strips of plastic canvas.
Step 4
Cut two pieces of waxed canvas 27″ tall and 16 inches wide. (You can change these measures to suit your needs.)
Step 5
Cut 1/2″ off the corners to facilitate folding a seam. Fold over and sew a 1/4″ seam on the bottom and sides.
Step 6
On the back canvas, on the bottom, sew D-ring loops on each end. These should be placed 2″ from the sides, 1″ from the bottom, angled toward the bottom corners.
Then, also on the back canvas, sew D-ring loops on each end on the top. These should be placed 1″ from the sides, 1″ from the top, angled toward the top corners.
Step 7

Place plastic canvas strips 1 1/2 ” below the top seam.
Secure the plastic canvas in the center with thread.
Step 8
Fold the top over the plastic canvas strips and sew in place.
Step 9
If you want to add any loops or pockets on the front, do so now.
Step 10
Sew the sides together with the remaining two D-Ring loops in the seam 6 ” from the top.
How to Maintain Your Harvest Bag
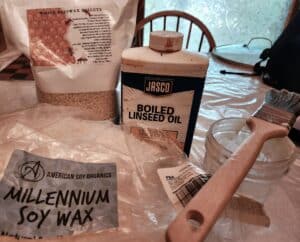
I’ve been using my harvest for 4 years now, and I confess to not cleaning it very often. The waxed canvas does a great job of repelling dirt and leaves. But my son examined it one day and declared it was time to rewax it. Standard wisdom is to do it yearly, but it worked well for me even after 4 years.
Step 1
Clean the bag. I hosed down the bag using the jet setting. Then, I turned it inside out and did the same. Finally, I hung it dry indoors for a day.
Step 2
Warning: Be careful with this step and take measures to avoid being burned by the melted wax.
Select a wide-mouth glass jar that your paintbrush will fit into easily. Add a mixture of 2 parts soy wax, 1 part beeswax, and a dash of boiled linseed oil. For my bag, we used 1/2 cup soy wax, 1/4 cup beeswax, and approximately 1 tablespoon boiled linseed oil.
Warning: Since this process involves the use of boiled linseed oil, it feels necessary to mention that it presents a fire hazard under some conditions. It’s pretty unlikely to be an issue when using a small quantity like 1 tbsp, but caution is always advised.
Step 3
Stretch your bag out on a surface that will catch excess melted wax. We used parchment paper on metal baking pans. Fill a saucepan with water high enough to melt your ingredients, place your glass jar in the pan, and melt over low heat. Use your paintbrush to distribute enough of the melted wax over the canvas to sink through both layers of the bag. It may start to harden. After applying the wax, we used a heat gun to ensure the wax was fully melted and soaking into the two layers of the bag. You can get a cheap clothes iron that you only use for this.
Step 4
Allow the bag to cure for about 24 hours before using it.
Caveat: My son wishes to emphasize that he is just an amateur and relied on internet research. You may want to consult additional sources.
Use Your Skills for Good
Consider using your artistic skills for good by creating and selling items like this harvest bag and donating the proceeds to the cause closest to your heart. Art as activism is a way you can combine your talents to make the world a better place.
READ NEXT
Support the Environment: Landscape Ideas to Delight You and Wildlife
I crocheted a canary to support the environment
Are You Excellent at Your Craft? Apply Your Obsession to Activism
How to Get Started in Activism
How to Perform Lawn Care That Improves the Environment


Great idea. My mother would enjoy a project like this!
Found your post on #SeniorSalon 😀
Gloria, I hope your mom makes you one. I love mine. Thanks for stopping by!
Beautiful bag. How would you wash waxed canvas? Thanks.
Just with a cloth and cold water. Thanks for stopping by!
Beautiful bag, need to share this with our DIL.
Thank you for sharing your links with us at #276 SSPS Linky. See you again next week.
Hi there, this is really great, I’m picking up the supplies tomorrow! Just to clarify, when you say “The straps wrap over my shoulders and around my back”, do you mean that they cross to make an X across your back? I couldn’t quite tell from the pictures. Thanks!
Terri, This post is one of my features for this week’s SSPS, thank you for sharing with us, we appreciate it! Melynda @scratchmadefood!
Thanks, Melynda! I’m honored to be featured.